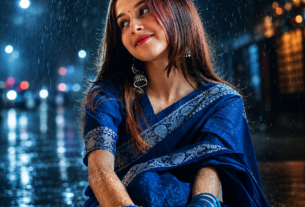

These cinematic portrait AI prompts are honestly one of the best things I have tried this year — and I found out about them in the most unexpected way. My friend sent me a photo and I genuinely thought it was from some big Bollywood shoot. Dark background. Blue neon glow. Studio-level lighting. I was about to ask which photographer she hired. And then she said — yaar, maine khud banaya. Phone se. AI se. Free mein.
That one moment. That is what started everything for me.
So basically, here is what is happening. People are using cinematic portrait AI prompts to transform a normal phone photo into something that looks like it came out of a professional film set or a high-end fashion magazine. You know those dark, moody portraits with dramatic lighting that keep blowing up on Instagram? That exact look. That is what this is.
Earlier you needed a studio, a proper DSLR, expensive lights, a skilled photographer, and honestly a decent budget. Now? You upload your photo, paste a cinematic portrait AI prompt, and the AI does the whole thing. Background. Lighting. Colour tones. Depth. All of it. Bas itna hi karna hai.
And see, it is not just adding a filter. It actually rebuilds the whole look of the photo. That is the part that surprises people the most when they try it for the first time.
How To Use Cinematic Portrait AI Prompts — Complete Step By Step Guide
Okay let me walk you through this. Not in a boring manual way. Just how I would actually explain it to a friend.
First thing first — you need a good photo. Clean. Clear. No heavy filters already on it. Front-facing works best. The reason is simple — the AI needs a clean base to start from. Think of it like giving a painter a fresh canvas. If the canvas already has five layers of paint, the new painting is going to look messy. So use an unedited original from your camera roll. That is honestly the most important step.
Now these cinematic portrait AI prompts are detailed on purpose. Every word in them tells the AI something specific — the lighting style, the background mood, the colour grading, the texture. Do not try to shorten them. Do not change words. Copy and paste exactly as they are. Scroll down, copy your prompt, and come back to continue reading.
✦ Copy Your Prompt Below
Paste directly into ChatGPT or Gemini after uploading your photo
What Each Cinematic Portrait AI Prompt Actually Does
Got your prompt? Good. Now here is what to expect from each one so you pick the right style for your photo.
Prompt 1 — Blue Neon Studio — gives the most dramatic result. Almost too dark for some photos, but if you want that bold night-shoot look, nothing beats it. Very vivid. Very electric. Best for photos with a plain background or a photo taken at night.
Prompt 2 — Fantasy Moonlight — is the softest of the three. My skin looked way more even than it actually is, which honestly felt a bit too smooth. But the eyes with this one are something else. That catchlight effect — that tiny reflection in the eyes — just makes the whole photo feel alive. Great for softer portraits and photos with natural light.
Prompt 3 — Luxury Gold Dark — took the longest to generate, around 45 seconds each time. But the gold tones came out exactly like I imagined. Deep navy and amber together. It is my personal favourite by a good margin. Honestly this one looks most like a proper magazine cover.
I tried all three cinematic portrait AI prompts on the same photo on the same day. Same lighting, same angle. The difference was massive. Prompt 1 for drama. Prompt 2 for softness. Prompt 3 for luxury. Pick based on the vibe you want that day.
AI Photo Editing Tips — Get The Best Result From Every Cinematic Portrait AI Prompt
Look, I made a lot of mistakes before I figured this out. Let me save you the trouble.
The biggest mistake — using a photo that is already heavily filtered. If you put in a photo with a strong filter on it, the AI gets confused. It tries to layer the new style on top of existing edits and the output comes out muddy. Use the original, clean photo from your camera roll. Always.
Lighting in your original photo matters way more than I expected. I tested this myself. Same prompt, two different photos. One taken under yellow indoor bulb light, and one near a window during the day. The window photo looked completely stunning. The bulb light one was just okay. The AI reads existing light and builds on it. Give it something good to build on.
One thing that genuinely surprised me — the AI handles eyes really well with these cinematic portrait AI prompts. That tiny white reflection in the eyes that makes them look alive and real — the AI added it on its own. I did not ask for it. It just did. Honestly that one detail makes the whole photo feel professional.
But here is what most people get wrong. They resize or compress the photo before uploading. Do not do that. Upload the full original image. More pixels means more detail for the AI to work with. And if the first result does not feel right — just try again. Same prompt, same photo. The third or fourth attempt is often way better than the first.
Now here is something nobody warns you about — if your hands are visible in the photo, be careful. I tried Prompt 3 on a photo where I was holding a phone. The AI made one hand look normal and turned the other into something with fingers going in random directions. It was genuinely unsettling. So now I only use face and shoulder close-ups. Clean output every time.
And glasses — I tried this on a photo where I was wearing sunglasses. The AI removed one lens and kept the other. Both eyes were visible but only one had the lens. So now I avoid any accessories near the face. No sunglasses, no big earrings. Keep it clean and the AI stays focused.
ChatGPT vs Gemini — Which One Actually Worked Better
I used both. Not just once — I tested the same photos with the same cinematic portrait AI prompts on both tools over multiple sessions. Here is what I actually found.
ChatGPT was faster but more aggressive with changes. Sometimes it would replace the background completely — not just darken it, but actually swap it for something else. For Prompt 1, ChatGPT was clearly better. The blue neon effect was much more vivid and the shadows were deeper.
Gemini was slower but more careful with the original photo. It kept things realistic and focused mostly on lighting and tone. For Prompt 2, Gemini gave me a better result every time. The soft dreamy feel was more natural. ChatGPT made Prompt 2 look a bit over-edited. For Prompt 3, both were similar but Gemini was more consistent across multiple tries.
| Prompt | ChatGPT | Gemini | Winner |
|---|---|---|---|
| Prompt 1 Blue Neon | Vivid neon, deep shadows, very dramatic | Good but slightly flat | ChatGPT |
| Prompt 2 Fantasy | Looked over-edited, too processed | Soft, natural, dreamy — exactly right | Gemini |
| Prompt 3 Gold Luxury | Good gold tones, less consistent | Slightly more consistent output | Both okay |
My actual workflow now — I run the prompt on both tools and compare. Takes an extra minute but the difference is real. You will see it immediately when you try.
How To Use These Trending Viral AI Photo Editing Prompts
The actual process. Simple. You can do this on your phone itself, no laptop needed.
Open ChatGPT. You need the GPT-4o version because it supports image uploads properly. If you have Plus, you are already there. If not, go to Gemini by Google — it is completely free and handles these cinematic portrait AI prompts very well. Both tools work great.
Start a new chat. Look for a paperclip or plus icon near the text box — that is your upload button. Upload your photo from your gallery. Wait for it to fully load before doing anything else. A lot of people paste the prompt before the image loads and wonder why the result looks weird.
Now scroll up, copy the full prompt you want. Paste it directly into the message box below the uploaded photo. Do not add anything extra — no “please edit my photo”, no extra instructions. Just the prompt, nothing else. Hit send.
It takes around 20 to 40 seconds. And then your result appears. If you like it — download it, save it, post it. If you want to try a different style, upload the same photo again and paste a different prompt. Try all three cinematic portrait AI prompts and compare side by side.
And a small tip — if you are on mobile and the download button is not obvious, just long press on the generated image. On most phones that gives you a save option directly.
Honestly, I think we are living in a quietly extraordinary time. The kind of photos that used to require a studio booking, expensive equipment, and a professional photographer — you can now create them sitting in your room, on your phone, for free. That is genuinely wild when you sit with that thought.
And I think that is a good thing. Creativity was never meant to be only for people who could afford the tools. Now the tools are here for everyone. That feeling — when you see your own photo transformed into something that looks like a magazine cover — honestly, that feeling is worth trying for.